You Might Not Need a Custom Block: The Block Variations API
When working with WordPress blocks, you don’t always need to create something brand new to get the look or functionality you want. Sometimes, just a few tweaks can make all the difference. That’s where Block Styles and Block Variations come in.
Block Styles let you change how a block looks without altering its structure. It’s like giving the same block a new outfit—same block, different style. In our last post, we used Block Styles to create custom designs for buttons and headers, making them stand out visually.
Block Variations, on the other hand, allow you to create different versions of a block with preset content, settings, or layouts. With Block Variations, you’re not just changing the block’s appearance—you’re also changing how it behaves or what content it starts with. It’s like having multiple ready-made templates of the same block that you can choose from depending on your needs.
In this post, we’ll look at how you can create and use Block Variations. I’ll walk you through some practical examples to show how you can easily make different versions of a block without having to code each one from scratch.
Previously, Block Variations were mainly registered using JavaScript. However, with the release of WordPress 6.5, it’s now possible to register Block Variations server-side using PHP. This new capability gives you more control and flexibility, especially if you prefer managing everything on the server side.
Simple CTA Block Variation
To create Block Variations using PHP, we’ll use the get_block_type_variations hook. This hook allows us to register variations on the server side, giving us more control over how these variations are managed and applied.
Let’s start by registering a simple Call-to-Action (CTA) block variation
function custom_block_variations( $variations, $block_type ) {
    if ( 'core/columns' === $block_type->name ) {
        $variations[] = [
            'name'        => 'cta-image-button',
            'title'       => __( 'Image, Button and Text', 'textdomain' ),
            'description' => __( 'A Call-to-Action with an image and button in the first column, and a long paragraph in the second column.', 'textdomain' ),
            'icon'        => 'feedback',
            'attributes'  => [
                'columns' => 2,
                'align'   => 'wide',
                'verticalAlignment' => 'center',
                'className' => 'is-style-cta-image-button',
            ],
            'innerBlocks' => [
                [
                    'core/column',
                    [],
                    [
                        [ 'core/image', [] ],
                        [
                            'core/button',
                            [
                                'text' => 'Learn More',
                                'className' => 'is-style-custom-primary-button'
                            ]
                        ],
                    ],
                ],
                [
                    'core/column',
                    [
                        'verticalAlignment' => 'center',
                    ],
                    [
                        [
                            'core/paragraph',
                            [
                                'placeholder' => 'This is a long paragraph explaining the details of your Call-to-Action. Add as much text as needed to convey your message.'
                            ]
                        ],
                    ],
                ],
            ],
        ];
    }
    return $variations;
}

add_filter( 'get_block_type_variations', __NAMESPACE__ . '\custom_block_variations', 10, 2 );
Hooking into Block Variations:
We start by using the get_block_type_variations filter to hook into the block variations for the core/columns block. This allows us to define custom variations for that block type.
Registering the Variation:
name: The unique identifier for this variation is cta-image-button.
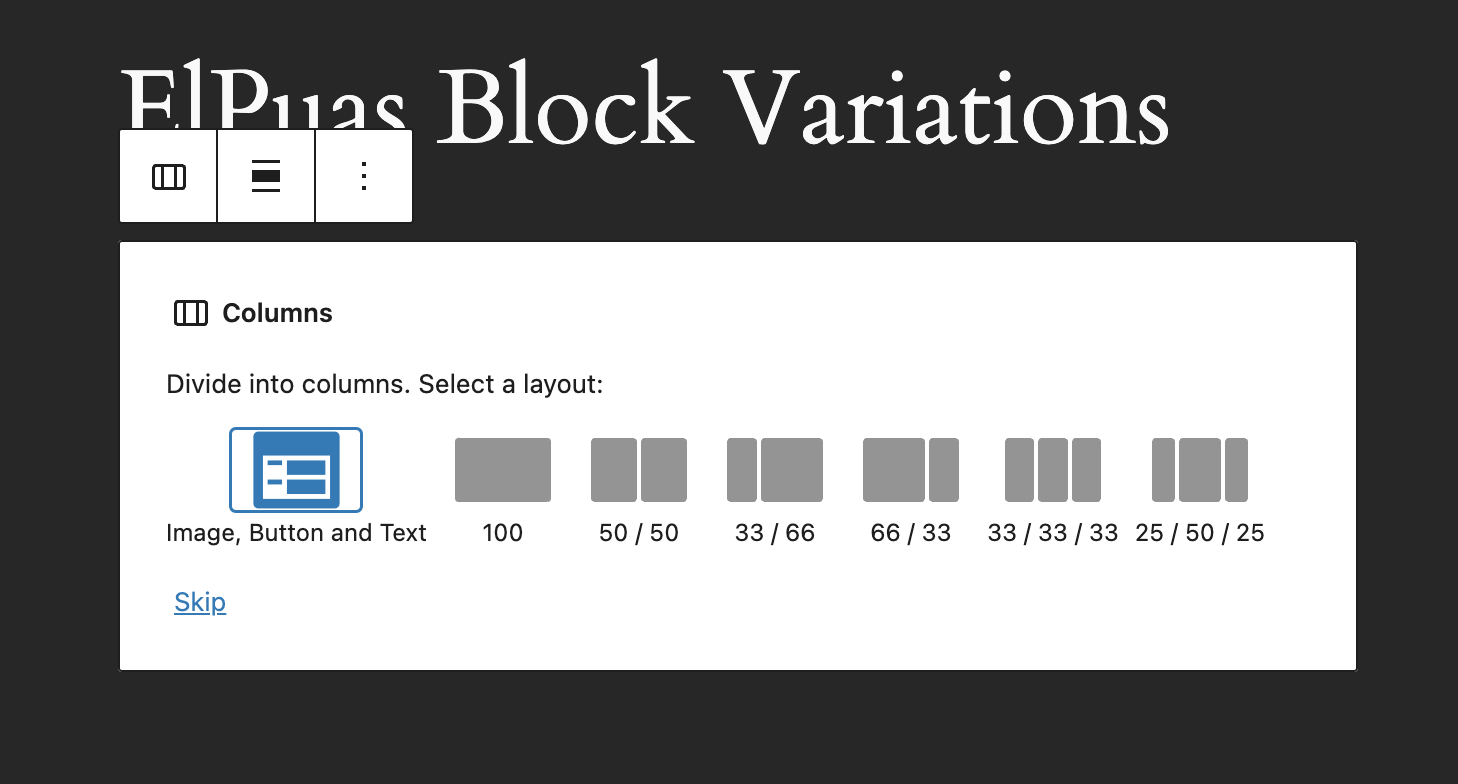
title: The variation is titled “Image, Button and Text,” which will be displayed in the block editor.
description: Provides a brief explanation of what this variation does—setting expectations for users.
icon: We’ve assigned the dashicons-feedback icon, making it easy to identify the variation in the block editor.
Setting Attributes:
columns: Sets the block to have two columns by default.
align: Aligns the block to be wide, making it span the full width of the content area.
verticalAlignment: Centers the content vertically within the columns.
className: Applies a custom class is-style-cta-image-button, which can be used for additional CSS styling.
Defining Inner Blocks:
First Column: Contains an image block (core/image) followed by a button block (core/button). The button includes a custom block style class ('is-style-custom-primary-button') and displays the text “Learn More.”
Second Column: Contains a paragraph block (core/paragraph) with a placeholder for a long text description, which is centered vertically in the column.
Applying the Filter:
Finally, we use the add_filter function to apply our custom_block_variations function to the get_block_type_variations hook, making sure our variation is registered correctly within the block editor.
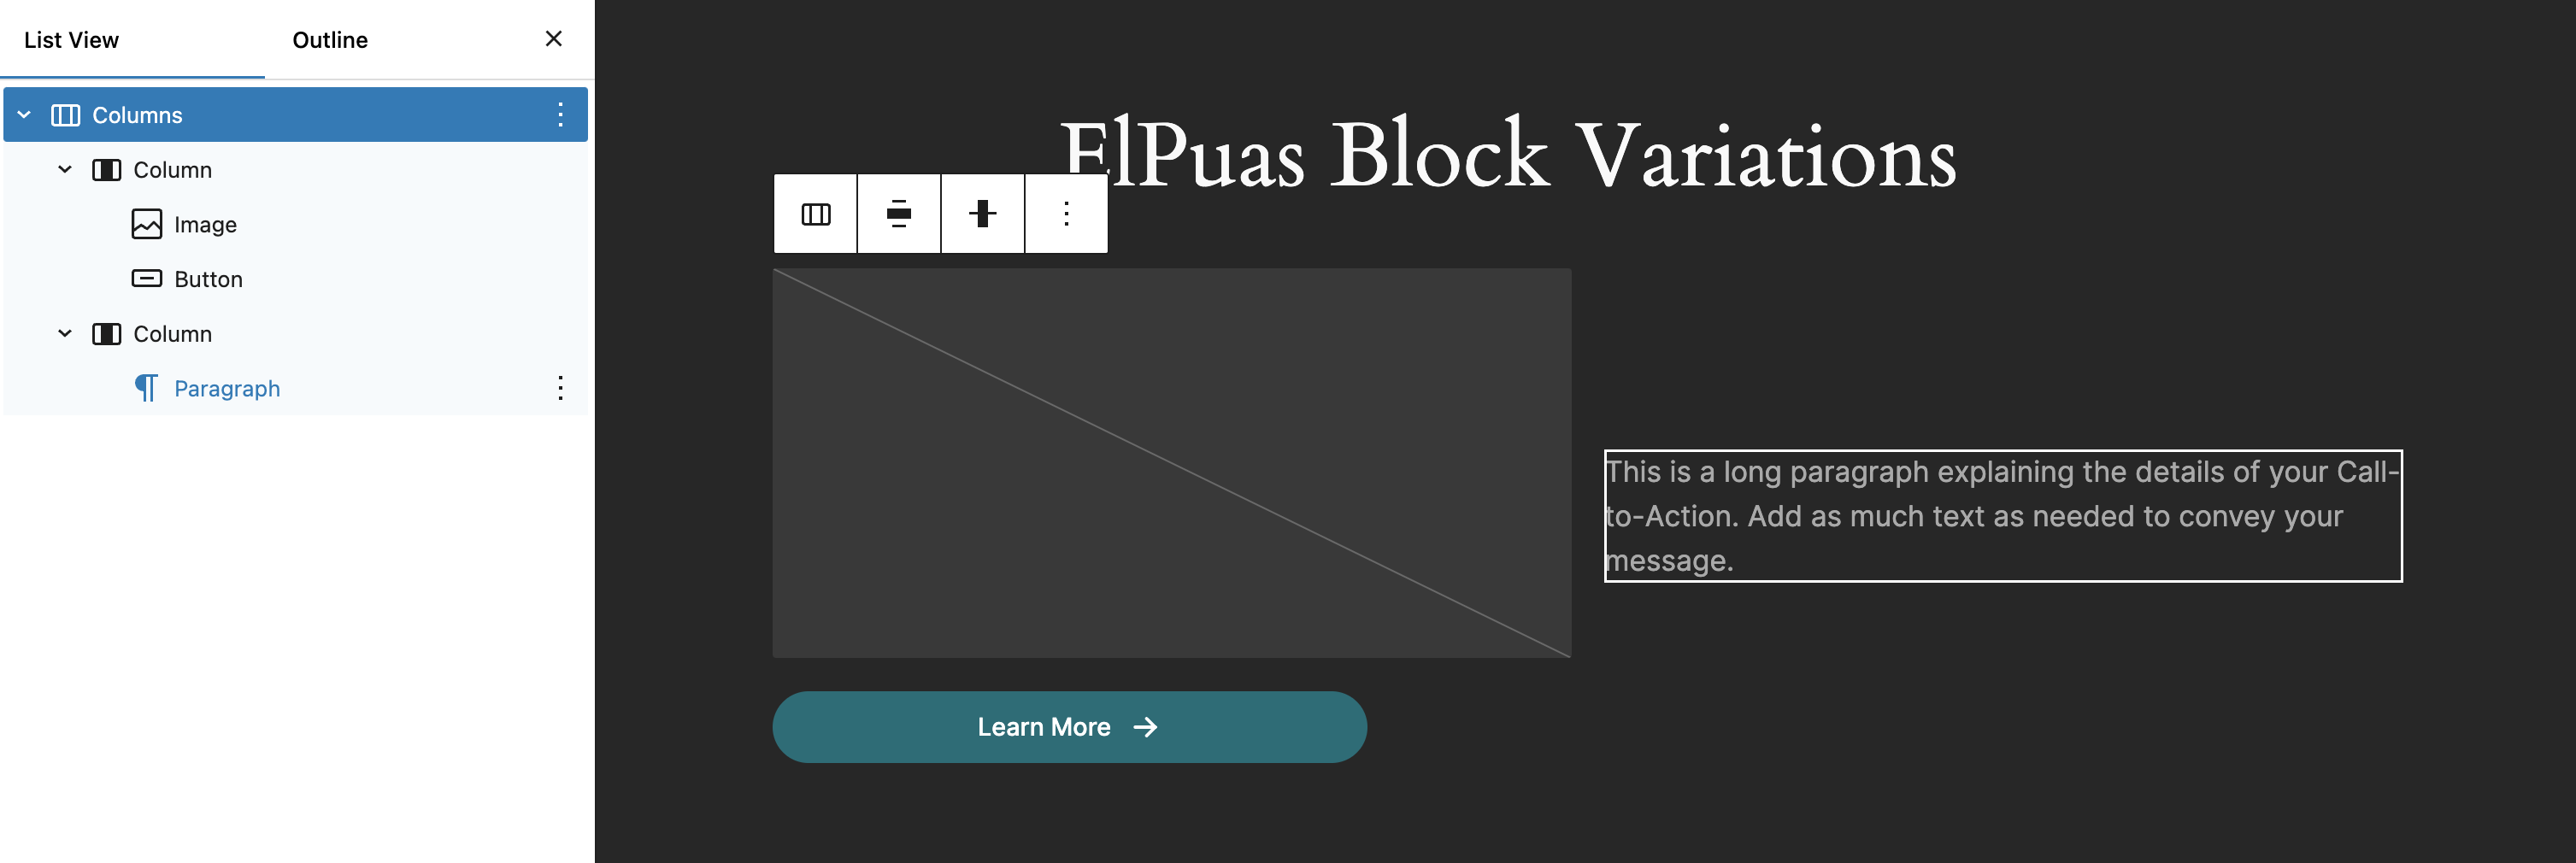
The images below show how the Image, Button, and Text variation looks in the WordPress editor


This variation makes it easy to create call-to-action sections that look good and work well across your site. With block variations, you can quickly add this ready-made layout wherever you need it, making sure your CTAs are both eye-catching and consistent with your design.
Creating the Team Query Block Variation
Now that we’ve successfully implemented a simple CTA Block Variation, it’s time to move on to something a bit more advanced. For our next variation, we’re going to create a Team Query Block. This will allow us to display a grid of team members, leveraging the power of the Query Loop block and a custom post type.
Step 1: Setting Up the Team Custom Post Type
First, we’ll need to create the Team custom post type. For this, we’ll use the Custom Post Type UI (CPTUI) plugin. This plugin makes it easy to set up custom post types without writing any code.
Install and Activate CPTUI:
Navigate to Plugins > Add New in your WordPress dashboard.
Search for “CPTUI” and install the plugin.
Once installed, activate the plugin.
Create the Team Custom Post Type:
In the WordPress dashboard, go to CPTUI > Add/Edit Post Types.
Under the “Add New Post Type” section, enter “team” as the post type slug.
Fill in the necessary labels like “Team Members” for plural and “Team Member” for singular.
Configure other settings as needed, such as enabling support for featured images, custom fields, and excerpts.
Save the post type.
Now that the Team post type is set up, we can move on to creating the Query Block Variation that will display these team members.
Creating the Team Query Block Variation
Now that we have our Team custom post type set up and the team members created, it’s time to build the Query Block Variation that will display these members in a grid format. This variation will be particularly useful for showcasing team members on different pages with a consistent layout.
We’ll use the get_block_type_variations hook in PHP, just like we did with the CTA Block Variation. This time, we’ll create a variation of the Query block that’s specifically crafted to display posts from the “Team” custom post type.
if ( 'core/query' === $block_type->name ) {
      $variations[] = [
          'name'        => 'team-query-grid',
          'title'       => __( 'Team Members Grid', 'elpuas' ),
          'description' => __( 'Display team members in a 3-column grid layout.', 'textdomain' ),
          'icon'        => 'dashicons-groups',
          'attributes'  => [
              'query' => [
                  'postType' => 'team',
                  'columns'  => 3,
                  'postsPerPage' => 6,
              ],
              'align'   => 'wide',
              'className' => 'is-style-team-query-grid',
          ],
          'allowedControls' => [ 'order', 'autor' ],
          'innerBlocks' => [
              [
                  'core/post-template',
                  [],
                  [
                      [ 'core/post-featured-image', [ 'sizeSlug' => 'medium' ] ],
                      [ 'core/post-title', [ 'level' => 3 ] ],
                  ],
              ],
          ],
      ];
  }
Hooking into the Query Block:
We use the get_block_type_variations filter to add a new variation to the core/query block, which is the block used for displaying lists of posts.
Registering the Variation:
name: The variation is identified as 'team-query-grid'.
title: It’s titled “Team Members Grid,” which will appear in the block editor.
description: A brief description explains that this variation displays team members in a 3-column grid layout.
icon: We’ve assigned the 'dashicons-groups' icon, which is suitable for a team layout.
Setting Attributes:
query: This is where we specify that the variation should pull posts from the “team” post type. It’s set to display 3 posts with up to 6 posts per page.
align: The block is aligned wide to span the full content area.
allowedControls: the Query Loop block variations support a property called allowedControls, which accepts an array of keys of the controls we want to display on the inspector sidebar.
className: A custom class 'is-style-team-query-grid' is applied for additional styling if needed.
Defining Inner Blocks:
Core Post Template:
The main content of each team member is structured within the core/post-template block.
Featured Image: Displays the featured image of each team member, with a medium size.
Post Title: Displays the name of the team member (the post title) with a heading level of 3.
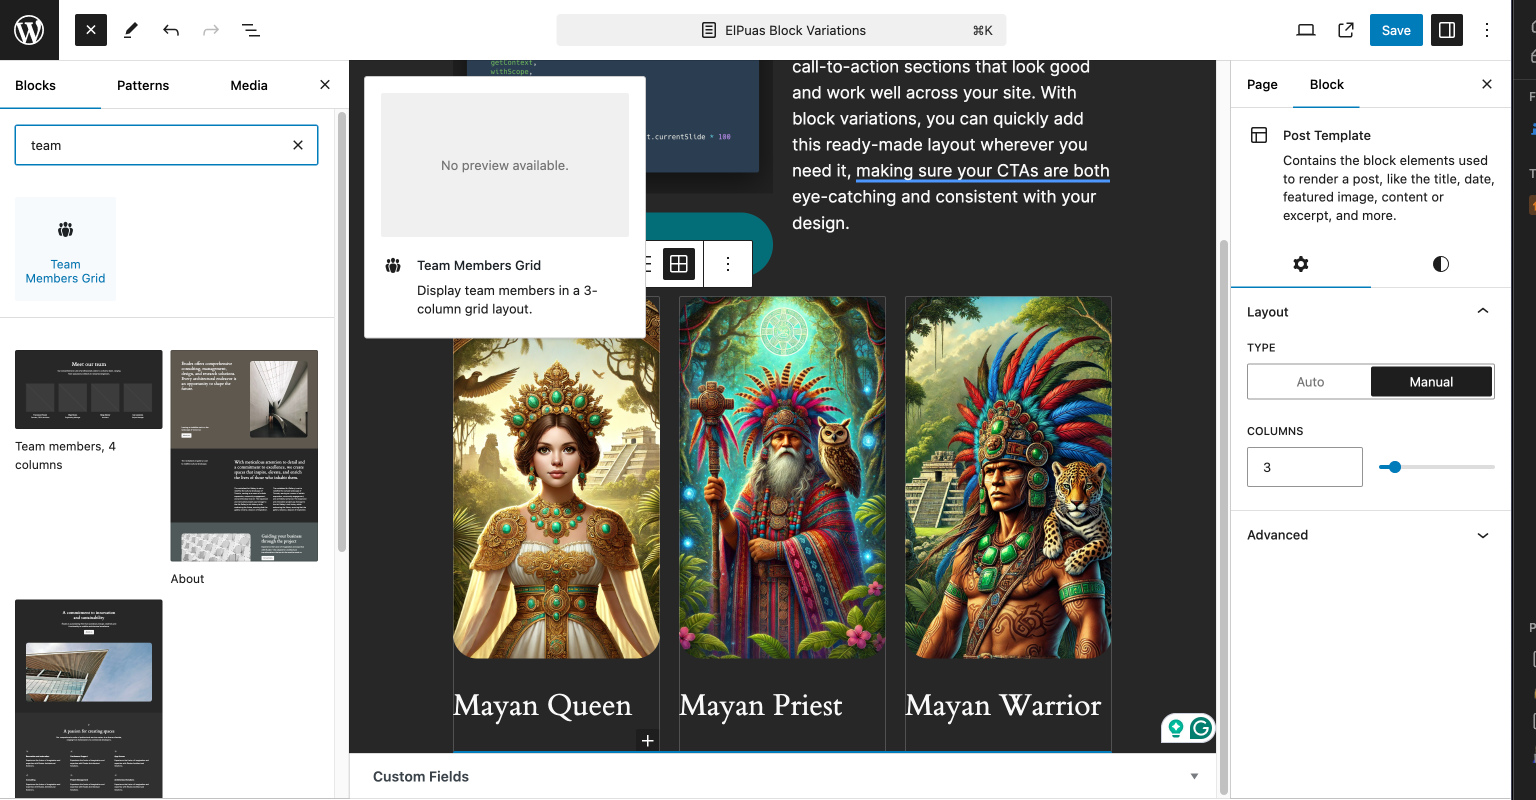
This variation provides a simple yet powerful way to display team members in a consistent and visually appealing manner across your site. You can now easily add this block to any page and it will automatically pull in the latest team members, maintaining a uniform design without needing to manually configure the query each time.
Handling a Blocker: Custom Styles for the Team Query Block
While working on the Team Query Block Variation, I encountered an issue when trying to set the layout attributes directly through the variation registration. It turned out that certain layout configurations, like setting the grid layout for the columns, weren’t applying as expected.
Looks like not all attributes can be passed directly during the registration process. Instead, I had to take a different approach to ensure the layout was applied correctly.
The Solution: Using Custom Styles
To overcome this issue, I decided to apply custom styles using CSS. By assigning a specific class to the variation and then enqueuing custom styles via the wp_enqueue_block_style function, I was able to control the layout and appearance of the Team Query Block.
Final Result: Team Query Block Variation
The images below showcase the final result of our Team Query Block Variation. This variation displays team members in a 3-column grid layout, using the custom styles we implemented.

Conclusion
In this post, we created two useful block variations: a CTA Block Variation and a Team Query Block Variation. The CTA variation helps you quickly build call-to-action sections, while the Team Query variation makes it easy to display team members in a neat grid.
Even though we hit a snag with setting layouts directly in the query variation, using custom styles solved the problem. These examples show how block variations can make your WordPress site more consistent and save you time.
You can find the complete code for these variations here. If you found this post helpful, please share it. Sharing is caring. Happy coding!
Give and Share
Enjoyed this article? Share it with your friends and colleagues!


